Fluffy Brioche Bread (With Overnight Option!)
This fluffy brioche bread is pillowy soft, lightly sweetened, and enriched with butter and eggs, giving it the perfect texture and flavor. Eat it with a little butter and jam, use it for stuffing, or turn it into french toast!

Homemade brioche bread is one of my favorite types of breads to eat – it is enriched with milk, butter, and eggs, so it has the softest texture and best buttery flavor. It can be used for cinnamon rolls, babka, french toast, etc. The options are endless!
Why you will love this fluffy brioche bread recipe
- The dough. This dough is so soft and fluffy! This recipe is fool proof and has easy, straight-forward instructions, so even the yeast novice will have a pillowy soft loaf!
- It’s incredibly versatile. Every baker should have a basic brioche recipe on hand. It can be used for so many things – sweet breads such as babka, cinnamon rolls, etc., or the baked bread can be used for stuffing or french toast!
- There is an overnight option. If you are someone who doesn’t want to babysit their bread while it rests, this recipe has an overnight option!

Ingredient notes
- All purpose flour: use unbleached all purpose flour for optimal results in terms of flavor and texture. The flour is important for gluten development, so make sure to use good quality flour.
- Nutmeg: a touch of ground nutmeg is mixed with the dry ingredients for a very subtle flavor. If you don’t want to use it, you don’t have to!
- Whole milk: whole milk is the best type of milk to use for flavor and texture. If using active yeast, the milk needs to be heated to 110F to activate it. If you are using instant yeast, the temperature of the milk does not really matter.
- Yeast: this bread rises with the help of yeast – we can use instant yeast or active yeast in this recipe.
- Sugar: granulated sugar is used to sweeten the bread just slightly. It also helps activate the yeast and create that golden brown color on top.
- Eggs: eggs are needed for an enriched dough. We also use one egg for an egg wash to make the dough nice and shiny!
- Vanilla extract: pure vanilla extract adds a nice flavor and sweetness to the bread. If you are looking for a savory loaf, feel free to omit it.
- Butter: unsalted butter is the butter of choice so we can control exactly how much salt goes into this recipe. Good quality butter is necessary for an enriched dough – it adds the best texture and buttery flavor.
- Heavy cream: used in the egg wash.

How to make the brioche dough
Step one: combine the dry ingredients
In the bowl of a stand mixer fitted with the hook attachment, combine the flour, salt, and nutmeg.
Step two: heat the milk to 110F
Combine the granulated sugar and yeast in a small bowl. Heat the milk to 110F – this is necessary for active yeast (the temperature does not matter for instant yeast). However, don’t make it boiling, otherwise the hot temperature can kill the yeast.
Stream the sugar/yeast mixture into the milk while continuously whisking. If using active yeast, let the mixture sit for 15 minutes while the yeast activates. If using instant yeast, simply move on to the next step.

Step three: mix in both eggs and vanilla
Add the eggs and vanilla extract and whisk to combine.
Step four: pour the wet ingredients into the dry ingredients
Pour the milk/yeast/egg mixture into the dry ingredients and mix on low-medium speed until combined or a ball forms around the dough hook.
Step five: add the cubed butter and knead
With the mixer on medium speed, add a few pieces of butter at a time, allowing the butter to fully incorporate before adding more. Once all of the butter is fully incorporated, mix for an additional 8-12 minutes on medium-high speed. The dough will be sticky at first, sticking to the bottom and sides of the pan as it mixes. As you knead, the dough should pull away from the sides of the bowl and turn into a smooth ball.
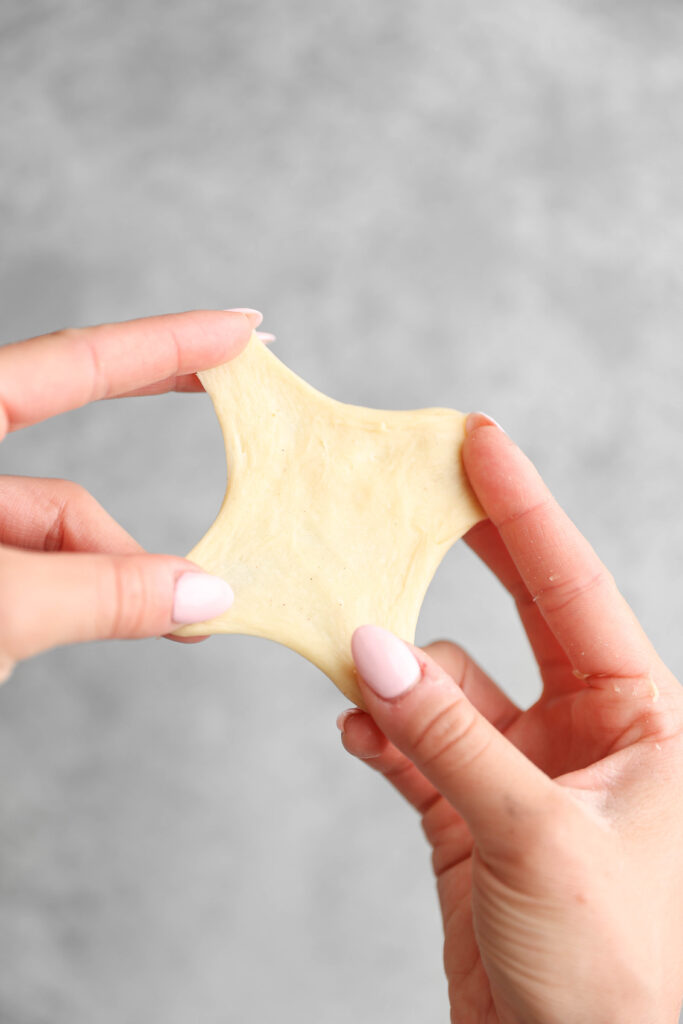
Step six: perform the window pane test
Tear off a small piece of dough and gently spread it apart in between your fingers. If the dough stretches easily without ripping and you can see light passing through it, the dough is ready to proof. If it rips, mix for another minute or two and try again.
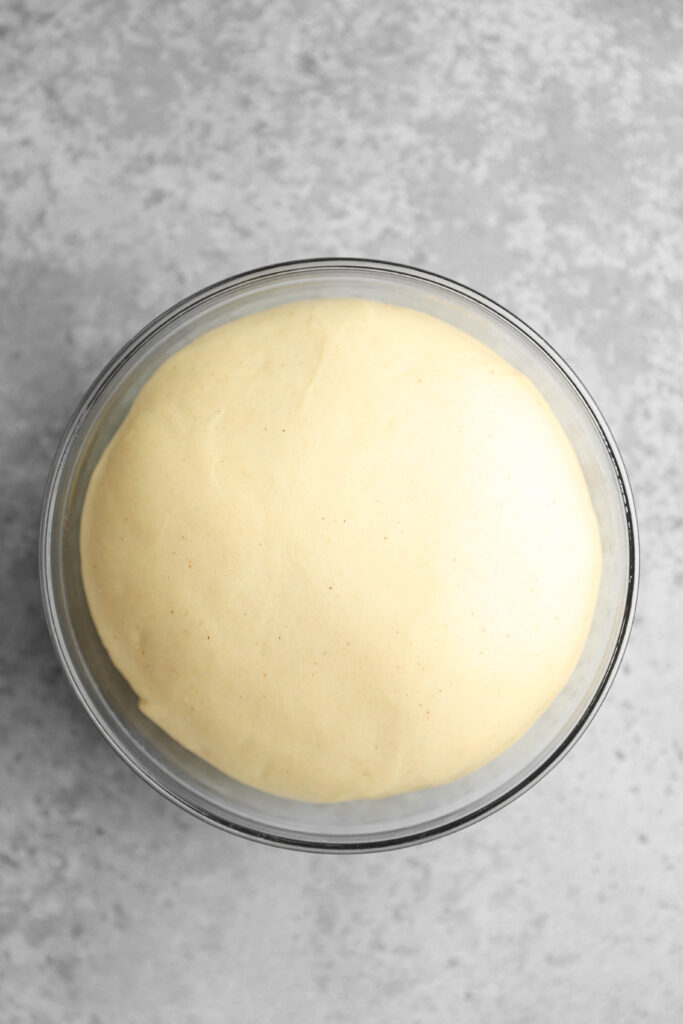
Step seven: let the dough rise
This dough can rise at room temperature, or in the fridge overnight (see below for an explanation on this). Either way, the dough should double in size.

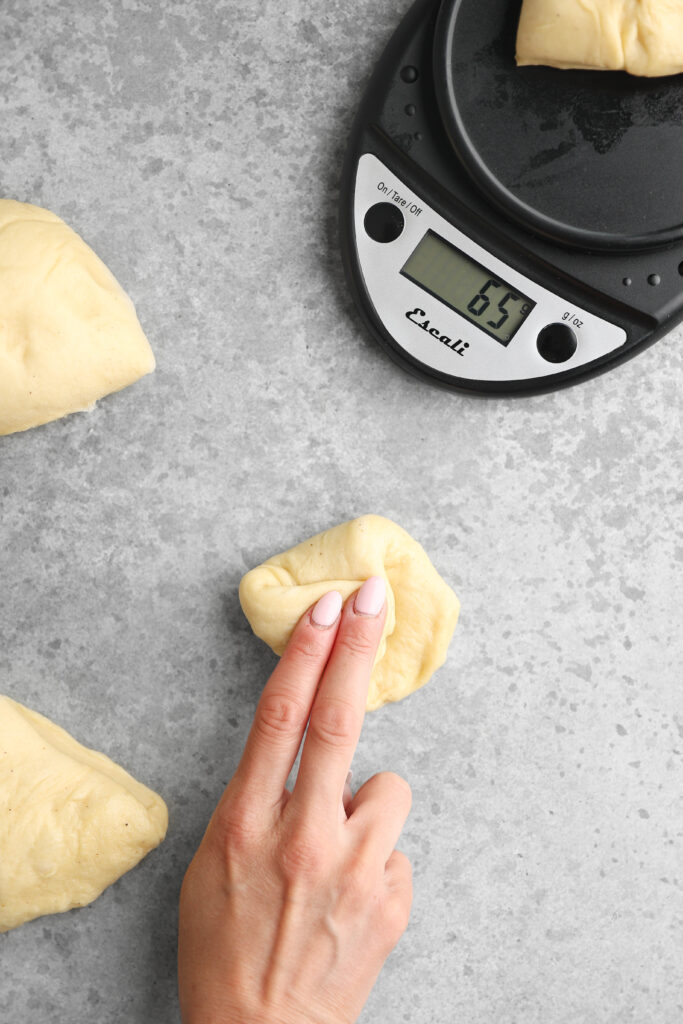
Step eight: shape the dough
On a non-floured surface, separate the dough into 8 pieces, weighing 65 grams each (you will have a little left over, which you can bake in a small loaf pan if desired). Flatten each piece on your surface, then take all of the sides and gently fold them upwards and inwards, pressing them into the center. Turn the dough over and roll into a smooth ball.
Step nine: proof the dough again
Arrange the dough in four rows of two in a pullman pan (perfect for baking bread!) or a standard 9×5 inch loaf pan. Cover and let the dough rise in a warm environment for about one hour, or until doubled in size.
Gently press your finger into the dough. If it bounces back slowly, it is ready. If it bounces back immediately, it needs more rest. And if it doesn’t bounce back at all, it is over-proofed and should be baked immediately.
Step ten: bake!
Brush the dough with the egg wash. Bake at 400F for 15 minutes until evenly golden on top. Then, reduce the oven temperature to 350F and bake for an additional 30 minutes until it is a deep golden brown. Allow the loaf to cool completely in the pan.


Bread baking tips
- Use a kitchen scale. I cannot stress this enough – a kitchen scale is the only way to ensure accurate results. They are cheap and will make cleaning up SO much easier.
- Don’t overheat the milk. If the milk is too hot, it can kill the yeast and the bread won’t rise.
- Make sure your yeast is fresh. This is a simple one, but yeast can be dead. I once tried making cinnamon rolls over and over and over again but the dough was just NOT rising. I thought I wasn’t activating it correctly, but turns out the yeast was just dead.
- Allow the dough to rise for the entire instructed time. Don’t rush the rise process! Interrupting the rise can result in a dense bread.
- If you let the dough rise in the fridge, make sure to bake within 24 hours. It is perfectly okay to let your dough rise in the fridge overnight. However, try not to let it reach that 24 hour mark, otherwise you run the risk of having an over-proofed dough.
- Use an egg wash. The only way to achieve a shiny, golden brown crust is to use an egg wash. Simply mix one egg with two tablespoons of heavy cream, then use your finger or a pastry brush to gently brush the mixture onto the dough.
- Use a pullman pan. This is mostly just for looks, so it is not necessary, but a pullman pan is wonderful for baking bread. It is similar to a standard 9×5 inch loaf pan, but is thinner, longer, and has straighter sides. This will give you those beautiful sharp edges/corners that is expected with a loaf of bread.

Baking in grams
I rely on gram measurements when testing recipes because they offer the highest level of accuracy (and less cleanup!). Unlike volume measurements, which can vary, grams provide a reliable and consistent standard. I carefully test all of my recipes using this kitchen scale, therefore I cannot guarantee the outcome when using volume measurements. However, volume measurements are available in the recipe card.
Other recipes you may like
Have you tried this recipe? I would love to know how it turned out! Leave a star rating & review below and tag @sturbridgebakery on Instagram so I can see photos & videos of your yummy bakes! Want to save this recipe for later? Tap the heart button on the right side of your screen!
This post may contain affiliate links.

Fluffy Brioche Bread (With Overnight Option!)
Ingredients
- 2 1/2 cups (313 grams) all purpose flour
- 1 teaspoon salt
- 1/4 teaspoon nutmeg
- 1/2 cup (120 grams) whole milk, room temperature
- 1 standard (7 grams) instant or active yeast packet, a standard yeast packet is about 2 1/4 teaspoons
- 1/4 cup (50 grams) granulated sugar
- 2 eggs, room temperature
- 1 teaspoon vanilla extract
- 5 tablespoons (71 grams) unsalted butter, room temperature, cut in cubes
Egg Wash
- 1 egg
- 2 tablespoons heavy cream
Equipment
- pullman loaf pan or a standard 9×5 inch loaf pan works!
Instructions
- In the bowl of a stand mixer fitted with the hook attachment, mix the flour, salt, and nutmeg. Set aside.
- Heat the milk to 110F (if you don’t have a thermometer, I usually microwave it for 30 seconds on high, which gets me to about 110-120F).
- While the milk is heating up, combine the yeast and the sugar in a small bowl. Set aside.
- While whisking constantly, slowly stream in the sugar/yeast mixture into the heated milk. If you are using active dry yeast, allow the mixture to sit for 15 minutes. The yeast will activate in this time. If using instant yeast, you don’t have to wait for the yeast to activate, simply move on to the next step.
- Mix the eggs and vanilla extract into the milk/yeast mixture. Whisk well to combine.
- Pour the milk/yeast/egg mixture into the flour and mix on low-medium speed for about 3 minutes, or until it forms a ball around the hook.
- With the mixer on medium speed, add the butter a few pieces at a time, allowing them to fully incorporate before adding more. Once all of the butter is fully incorporated, turn the mixer up to medium-high speed and knead for an additional 8-12 minutes (mine usually takes about 10 minutes).
- To check if the dough has kneaded enough, rip off a small piece of dough and spread it gently in between your fingers. If it stretches easily without ripping and you can see light passing through it, it is finished and ready to proof.
- Transfer the dough to a lightly greased bowl, cover with a towel, and let it rise in a warm environment for about 1 hour, or until doubled in size. Alternatively, cover the bowl with plastic wrap and let it rise in the fridge overnight.
- Once proofed, remove the dough from the bowl onto a non-floured surface. If you use a floured surface, you won’t be able to shape the dough properly. Divide the dough into eight 65 gram pieces (you will have a little leftover, which you can bake in a separate loaf pan if you like).
- To shape, flatten each piece on your surface, then take all of the sides and gently fold them upwards and inwards, pressing them into the center. Turn the dough over and roll into a smooth ball.
- Arrange the dough in four rows of two in your pan. Cover and let rise in a warm environment for one hour, or until doubled in size.
- Press your finger into the dough – if it bounces back immediately, it needs more rest. If it doesn’t bounce back at all, it is over-proofed and should be baked immediately. If it bounces back slowly, it’s ready to be baked.
- In a small bowl, gently whisk together one egg and two tablespoons of heavy cream. Use a pastry brush or your finger to brush the dough with the egg wash you just created.
- Let the dough bake at 400F for about 15 minutes – at this point, the dough should be evenly golden on top. Then, without opening the oven door, reduce the temperature to 350F and bake for an additional 30 minutes. The color should be a deep golden brown.
- Allow the brioche to cool completely in the pan.
Tried this recipe? Make sure to rate and review and tag @sturbridgebakery on Instagram!


I made this a second time and both times it turned out beautifully! Looked just like the photos and I followed the recipe exactly. I cut into thick slices the first time to make French toast and it was incredible, I plan to do the same with this loaf too. I just saw you have a brioche cinnamon roll recipe- so you best believe I’ll be trying that soon too. So good, thank you!
Thank you Faith!! 🙂